Monday, March 26, 2012

Independence Day March 26, 2012

As promised my updated Independence Days list for the week. 

PLANT SOMETHING: I started my seeds.


HARVEST SOMETHING: Eggs of course - not much else is up in the garden yet at this point except some really tiny chives.


PRESERVE SOMETHING: I canned turkey, turkey broth and garbanzo beans with spices (ready for hummus!)


WASTE NOT: I boiled the turkey bones down to make the broth but I'm still not happy with how much seems to get wasted.  I need to improve how I go about it - any suggestions?


WANT NOT: This is the area for purchases for the future.  Here's all the herbs I ordered ready for storage in a cool dark place.


EAT THE FOOD: We've had several stews - one with leftover turkey and beans on canning day.  I made another batch of yogurt but I think I added the yogurt culture to the milk when it was still a little too hot - it turned out a little running but yummy!


COMMUNITY FOOD SYSTEMS: Chatted with a friend about canning - does that count?


SKILL UP: I've been reading about pastured chickens and working out a plan to turn an old trailer into a moveable chicken tractor for the meatie birds this summer.  We pumped up the tires, dragged it out of the barn where it has been sitting for 20+ years.  Now it's sitting in all it's broken-down glory in the driveway awaiting transformation.

Don't be a chicken!


We also are enjoying our newly finished feed room in the barn - thanks to our son in law who worked on it all day on Saturday.  It looks wonderful!  No more raccoons and other critters getting into the feed.  It's all so clean and organized - that makes me a happy girl!

Anyone going to join Jayne and I on this challenge?  Remember it's only to encouragement us to head in the right direction - did you do ONE thing on the list?  Celebrate and tell me about it!


Friday, March 23, 2012

Sauerkraut the Easy Way!

A friend of mine in Ohio got me interested in trying sauerkraut when we visited their family last month.  She had a simpler (read: less scary ) method than a huge crock with somewhat smelly contents so I thought I would give it a try.  I'll save mass production for another time!


The first step is to drill a hole in a Canning jar STORAGE LID.  I measured the rubber bung and drew a circle on the lid as a guide and drilled accordingly.  Drilling from the inside of the lid out (which is opposite of how I took the picture) seemed to give me better control of the bit but it still wasn't dead center which doesn't really matter.  I recommend a scrap piece of wood underneath your drilling area or a huge stack of newspapers which is what I did.


This is a common item in wine making stores called an airlock. It gets filled with water to create a barrier so the sauerkraut can ferment and gases escape but no air can get in to cause spoilage.  The airlock is a very "expensive and sophisticated" piece of equipment costing all of $2.50 in total but was free for me because my friend gave it to me!  A way to a friends heart...


Insert the airlock... into the bung... into the hole.. into the lid - sounds like a kids song coming on!  Remove the plastic cap on the top and add water to the line that is midway down the airlock.  Replace the cap.


Grate your cabbage to whatever size you prefer.  I choose to go middle of the road and was able to use my madolin slicer to quickly do the job.  A food processor with an attachment will work as will a sharp knife and a cutting board.


I used a 1.5 litre canning jar for this project and I was able to fit almost an entire head of cabbage in it.  Layer the cabbage with a sprinkle of salt ( I used a combined total of approx. 1 Tbsp.) and use something to tamp it down to help release the juice.  The salt will also help the juices to release.  I was able to repurpose a wooden pestle from from fruit strainer but a wooden spoon or the end of a rolling pin could work too if it fits in the jar. 


The picture above is what it looked like when I just finished packing it.  It needs to be packed down tightly!  I used a leftover piece of cabbage and cut it to form a plug at the top of the jar and then added a little bit of water to get the process going. Then I added the lid and waited.

I was told it would be ready in a few days but I've had mine going for almost two weeks.  I suspect that temperature has something to do with it.  It has been quite cool in the house.  I also discovered that it needs to ferment in a dark place - or be covered up.  Oops I didn't do that but it seems to have turned out fine.  You can leave it as long as you like.

The taste test has revealed a sauerkraut that is far more crunchy and delicious than the rather soggy store-bought-in-a-jar kind.  I like it but I'm going to leave it another week or so and check it again.  When it has reached your desired level of crunchiness you just remove the lid and put on a regular storage lid and keep it in the refridgerator.  It will last for months.

Sauerkraut literally means "sour cabbage" in German.  This traditional method of preservation (in large crocks) was a way to keep cabbage over the winter.  Fermenting also preseves the vitamin C and other vitamins and aids in digestion. 

It's good for you, it tastes good AND it's a great preservation technique - what are you waiting for? 

Tuesday, March 20, 2012

Working towards Greater Self-Sufficiency

I've been thinking about my last post on the book by Sharon Astyk Independence Days and what it means to me.  Here are some of my thoughts.

We have made a conscious effort to take a good hard look at our lives over the years. We are not wanting to be independent of people  - as the title might suggest - in fact we want to become more inter-dependent.  The Independence had more to do with living life more deeply or more fully and perhaps in a more REAL and thoughtful way.  It began more than 10 years ago when several situations revealed how dependent we were on someone else aka "the system" to take care of us.

We needed the electric company to keep the lights on and the stove working.
We needed the water utility to keep the water running.
We needed grocery stores to supply us with weekly food.
We needed oil to heat our home and electricity to start the furnace and run the fan.


If anything went wrong with "the system" at that point there was almost NOTHING we could do about it.  We couldn't fix it anyway.  We were essentially at the mercy of a system that could fail at any time and did on several occasions simply because we hadn't ever thought about it before it happened.  We were very unprepared..

I remember one cold winter day in our home in the city.  The power was out again.  We lived in an area of town that had frequent power outages - perhaps because we were in an older subdivision.  The first hour wasn't too bad.  By hour two the kids and I were cuddled up on the couch under blankets watching a movie on the last of the computers battery.  By hour three we had layers of clothes on.  By the time hour 5 came along we had to leave the house - it was just too cold to stay and by then it was also getting dark.  We had flashlights and even a Coleman camp stove (somewhere in the back shed with the other camping supplies) but without heat we couldn't stay.

Six hours max- not exactly a happy thought.  Each hour I would declare - the power MUST be coming back on very soon - let's just wait a bit longer.  Thankfully THAT day we just had to drive to another part of town that was unaffected by the power outage and get warm - our friends even fed us dinner.

Then there was the infamous multi-day power outage that occurred in the middle of the biggest heat wave of the summer.  With no electricity, the grocery stores had to close because they didn't have a way to keep the freezers and fridges running and the gas stations didn't have electricity for the gas pumps.  No ATMs were functioning so it was a cash-only scenario at some little convenience stores, no video games could be played after the batteries died (blessed peace and quiet!), no TV (I liked that part too!)  ...the freezers defrosted, the food in the fridge was quickly spoiling and BOY-OH-BOY it was HOT and we had no way to plug in a fan to cool down.

We decided we didn't like being dependent on "someone else" very much.  I hated the helpless feeling I had while trying to deal with simple every-day tasks that we all take for granted.  It was the beginning of a complete change of direction in our lives.

We started with simple things. Thinking out the basics we tried to find solutions for heat, light, food and water.  We moved the camp stove and lantern out of the shed into a more accessible place, made sure we had a lighter, matches, extra candles and holders somewhere in a cupboard close by. We bought some inexpensive kerosene lanterns and fuel.  We added some extra food to the pantry that was easy to prepare.  We reorganized the linen closet to make room for the sleeping bags. we already owned   None of these preparations were going to solve every problem but it sure made life easier the next time we experienced a power outage.

Those simple solutions led to some deeper conversations about other areas where we could become more prepared for example: OTC medicines we could have on hand before cold and flu season and allergy season.  It seemed a reasonable step to work out what we used most often and build a medicine cabinet first aid kit.  There's nothing worse than someone coming down with something and having to go to the drug store at midnight - especially when the very item you need to purchase was on sale a few weeks earlier but now in your moment of need is FULL PRICE (excuse the swear word). 

We got to a point where we could have weathered most storms in town of short duration -  but any length of time and we would have run out of options (kerosene, food, propane and water) pretty quickly.  Our hearts were moving swiftly towards our long held dream of living in the country and right along with it was the opportunity to become more self-sufficient.

Wowzers - a dream pantry!
We've been working and talking and thinking about the same issues for 10 years now.  In town we were looking for cheap portable solutions now we're looking into more permanent ones.  A woodstove is near top of the list.  We've increased our food storage of foods we eat regularly.  We're working on producing a greater amount of food from our farm.  Eggs, duck and chicken are covered but the garden is a work in progress.  We've also planted fruit trees and berry bushes with more in the works for the spring.  We are constantly working on plans to improve our situation here and lessen our dependency on "the system".

We would love to have solar panels and a host of other larger improvements but for now we just keep working with what we have and moving mostly in the right direction.


So back to Independence Days...


Let's face it - everyone is busy. All we need is to try to cram MORE into our lives.  BUT maybe thats the problem...maybe we need LESS.  More of the good and less of the energy draining activities of life.  We decided that having meals together at home was more important than running out to kids sports events every night.  We chose to homeschool - some might say that made life MORE complicated but it added a richness and quality to our lives that is near impossible to describe and I can't recommend it enough.  We were still busy but we were making choices that were right for us.  Everyone's choices may be different and there is no right or wrong answer as to what needs to be done.  I can only HIGHLY recommend MAKING conscious choices instead of just doing what everyone else does and then having an unsettled feeling that everything is not as it should be.


I have no illusions about my own situation  right now - I will not be able to make contributions to this list every day - probably not even every week in every area but keeping it in the forefront of my mind will steer me in the right direction.  I AIM to work at it.  I will not do things perfectly.  I will at times be too busy with others things to do ANY of it but I don't want that to prevent me from trying at all.

So this week:
PLANT SOMETHING: I soaked some seeds to make sprouts for salad.
HARVEST SOMETHING: I collected eggs - rather a cop-out since we do that every day!
PRESERVE SOMETHING: I made sauerkraut and yogurt.
WASTE NOT: I got most of the food scraps into the bucket for the chickens and I am making soup tomorrow out of the chicken leftovers from last night.
WANT NOT: I ordered and received a box of organic herbs and dried plants for teas and tinctures that should help to keep us healthy for the next few years.
EAT THE FOOD: We eat home canned food almost every day - applesauce, pickles, yogurt and sprouts this week. Eggs and chicken too of course.
COMMUNITY FOOD SYSTEMS: I'm writing this blog post as my encouragement to community food systems :)
SKILL UP: I've been reading about starting seeds indoors and tomorrow I start planting.

All of this planning over the years has been life-enriching - I would even say soul-enriching.  There is something very satisfying about being directly involved in producing your own food and being more closely related to how it gets to the table.  It seems our family has made an exchange - we chose to leave the standard North American lifestyle for something that WE think is more authentic - as Hannah would say - WE HAVE THE BEST OF BOTH WORLDS.  We still have high speed internet and most of the modern conveniences of living in the 21st century ( we gave up TV) but we also have a life we CHOOSE instead of one we live by default.


It's been a long process and we are no where near the end of it.  Life is a never ending opportunity to learn and grown and I am excited to be on the journey.


We are not prepared for everything but we did manage the doggie-skunk disaster with barely a blip this week. We could last a few days without electricity because we can heat our home, cook multiple ways, we would eat well and drink clean water.

So ultimately WHY do I think all this is important??Maybe you think I'm crazy - I don't think I'm crazy but that's rather subjective.  Maybe you wonder what on earth I am worried about.    I no longer worry about a lot of things because we decided to design a plan and get PREPARED. 

How about you?

Friday, March 16, 2012

Independence Days: book review and challenge

I've been reading Sharon Astyks book Independence Days: A Guide to Sustainable Food Storage & Preservation.  I have already found it to be a "go-to" book to keep myself motivated to keep moving forward with food storage and food preservation.  Sharon wrote the following on her blog recently and I want to play along - she calls it her Independence Days Challenge.  Read on!

________________________________________________


Well, to general acclaim I’m bringing back the Independence Days challenge and I do hope you’ll all sign up and participate. 


The whole idea is to get the positive sense of your accomplishments – it is easy to think we haven’t done anything to move forward, but in fact, we all do, almost every day. We just think of accomplishment as a big thing – a whole day spent putting up applesauce or a hundred tomato plants. The Independence Day project makes us count our little accomplishments and see that we are moving forward. So for each week, tell us what you have done in the following categories:


Plant something: A lot of us were trained to think of planting as done once a year, but if you start seeds, do season extension and succession plant, you’ll get much, much more out of your garden, so I try and plant something every day from February into September.


Harvest something: Everything counts – from the milk and eggs you get from your animals to the first dandelions from your yard to 50 bushels of tomatoes – it all counts.


Preserve something: Again, I find preserving is most productive if I try and do a little every day that there is anything, from the first dried raspberry leaves and jarred rhubarb to the last squashes at the end of the season.


Waste not: Reducing food waste, composting everything or feeding it to animals, reducing your use of disposables and creation of garbage, reusing things that would otherwise go to waste, making sure your preserved and stored foods are kept in good shape – all of these count.


Want Not: Adding to your food storage or stash of goods for emergencies, building up resources that will be useful in the long term.


Eat the Food: Making full and good use of what you have, making sure that you are getting everything you can from your food, trying new recipes and new cooking ideas, eating out of your storage!


Build community food systems: What have you done to help other people have better food access or to make your local food system more resilient?


Skill up: What did you learn this week that will help you in the future – could be as simple as fixing the faucet or as hard as building a shed, as simple as a new way of keeping records or as complicated as making shoes. Whatever you are learning, you get a merit badge for it – this is important stuff.


Ok, let’s see what we can get done!
Happy Independence Days!
Sharon

__________________________________________________

I think it's a GREAT idea.  I can already see that keeping track every day isn't going to happen most of the time but being aware of these specific areas, setting some goals for the week and reporting on my progress might help.  Will you join me?  Jump right in!  It's not a competition - let's just see what we can do!

Wednesday, March 14, 2012

How to De-Skunk a Dog


Well - the inevitable happened.  I worried about this many times over the years perhaps more than most "normal" people - and last night was THE night. 


The trouble begins when Levi the Dog had to do his business at 3am.  We trade off on night duty because no one like to get out of a warm bed so DH let him out.  We've TALKED many times about using a leash at night because we were worried about a skunk-encounter but you know how it goes...you need to find a rope and a clip and remember to hook it up in your half sleep-induced state - it SO-didn't-happen.


Since DH let him out I was in charge of letting him back in.  OH oh.  The dog came racing into the house and jumped up on his favorite chair before the aroma hit DH and he started to holler - GET-HIM-BACK-OUTSIDE!!!!


I was the lucky one who had to carry him back outside and tie him to the cistern pump while he struggled to get away and I furiously tried to figure out what-we-were-gonna-do-now!  Now the part this story that makes it especially interesting is the fact that I do not have sense of smell. For my dear friend Mandi I looked up the official term: Anosmia (syn: anosphrasia)­ The medical term describing the total absence of the sense of smell, i.e., the inability to detect or recognize any vapor (including skunk-stench!).

Yup - that would be me - zip...zero...nothing in the smell department.


Thankfully my worrying in the past paid off because I had come across an article a few years back on what-to-do in the case of a skunk-encounter that didn't include the use of tomato juice which I know everyone SAYS will work but most of the reviews after the fact said it didn't help much at all and was very messy.  I was thankful to quickly find the info  which I had saved on my computer in OneNote (which is an amazing MS program!) under Disaster Preparations. How appropriate.

Secret De-Skunk Sauce Recipe:

1L bottle (large) hydrogen peroxide
1L of water 
1/2 box of baking soda 
3 tablespoons of dish washing liquid (Dawn apparently works best but I only had Palmolive). 

Stir together and start soak the dog in it - do this outside - by wetting his fur thoroughly and continuing to work it through with a rag for a minimum of 15 minutes keeping it away from his eyes and mouth.  We took pity on his freezing-furry-behindy and did the final long rinse in the bath tub.  He came out clean-as-a-whistle and they tell me he smelled great - like he's just had a bath - no skunk smell at all! Of course he smelled fine to me to begin with!  Imagine for a moment if I had been home alone... 


I don't think it was a direct hit - that might have required a double application and a clothespin for DH.


Another disaster averted.  My son asked me if I thought this would end Levi's skunk-chasing days...somehow I doubt it.  The lady whose recipe I used said she was thrilled with the de-skunk sauce and she knew it worked really well because they'd already used it 4 times on their dog.


OH dear.  Time to get that leash hooked up.

Wednesday, March 7, 2012

A Manual Grain Mill and why you need one.

My manual grain mill is finally set up in the kitchen.  I decided on the Diamant after test-driving a few models in person at the store.  I've heard many great reviews about the Country Living Grain Mill and it is a less costly choice but I decided on the Diamant because I liked the cast iron heavy duty-ness of it. It also turned with less effort than the Country Living. I was buying this one to last a lifetime and feel I have one that will be handed down to my kids.  There are cheaper and simpler options and any option is better than none in-my-opinion while you're saving for the one you really want. 


As I mentioned in an earlier post I have been wanting a grain mill for a few years.  Most people would question my sanity at this point - what on earth for??? Stores carry huge bags of flour - if you really wanted to start baking your own bread - WHY NOT JUST BUY FLOUR OR BREAD AT THE GROCERY STORE? 


Well - here are a few good reasons.

Flour purchased at the grocery store has a shelf life of about 4 months.  If we assume for a moment that the flour was ground the day before it arrived at the store and you purchased it that very next day you would then have 4 months till it went rancid and that would be under optimal storage conditions.  Most people don't even know what rancid flour tastes and smells like - that's because most people can't tell.  I can't either.  I can however tell when I've eaten something with old flour in it!! I have a wallop of an allergy attack.

In an earlier blog post I mentioned this article...Scientists have revealed some shocking truth about packaged flour ... Reports say that 50% of the nutritional value of grain is lost within first 24 hours of making flour, and of the remaining; another 50% is lost within the next three days. (http://www.squidoo.com/diamant-grain-mill)

From a strictly financial standpoint buying wheat kernels and spelt kernels  etc. in bulk  is much cheaper than buying preground flour and it lasts for years in it's whole state without loosing nutritional value if properly stored. I buy mine at Grain Process in Toronto in 25kg bags. (Nina - I promised to write a post on how to properly store grains - stay tuned!)


Even OUR FAVORITE-UP-TILL-NOW cheap healthy bread made with whole grains and fiber is never less than $2.50 a loaf.


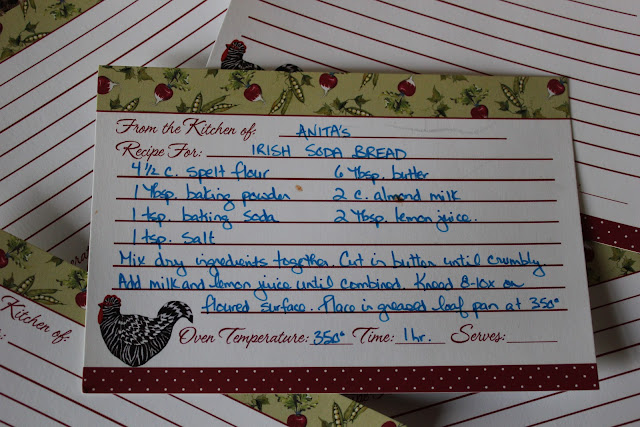
A manual grain mill doesn't require electricity - it does however require human-power and I was working my muscles to grind the 4 1/2 cups required for the Irish Soda Bread I made yesterday.  Sorry - we ate 1/2 of it before I took the picture.  It tasted great!  I did bake it in the oven - not cook it on the stove.  The mill could be electrified but what fun would that be!
The Diamant is able to grind all kinds of grains, rice,spices, sugar, nuts, seeds and coffee -someone asked me if it was a coffee grinder - ah yes - but that would be a LOT of coffee!


Being prepared for periods without electricity and still being able to make my own bread etc. in the long term appeals to me.  No electricity means no electric oven either  but bread can be baked in a dutch oven over a fire or camp stove as well. 


Here's one of my favorite basic recipes for Irish Soda Bread - you can use wheat instead of spelt and regular milk or powdered milk instead of almond milk and oil instead of butter so the recipe is quite flexible.  These ingredients are very simple to store in quantity on the shelf so it's perfect for planning your food storage.  I try to mix up the flours and grains we use to create variety and to get the benefits of some of the less common grains.


Now - get cracking with your food storage - what's in YOUR pantry?


If you liked this post please share it with your friends and leave me a comment.

Tuesday, March 6, 2012

Animal adventures - get one named after YOU!

We've had some addtions to the farm this week which is always an exciting prospect and usually leads to some kind of delightful-chaos and this time was no exception.

In the interest of flock-diversification which is code for OH-MY-WHAT-PRETTY-CHICKENS I bought 11 new ladies from Farmer Joy who lives about 15 minutes away. There are several Black Sex-links, some Barred Rocks and a few White Rocks - all egg layers. Last year the McRae family gave us their one-remaining-chicken - a Barred Rock we called Mrs. McRae - but she disappeared in a flurry-of-feathers one fine summer evening when she missed roll call and stayed out all night.  They are beautiful birds so I was happy to get another of the same breed.


DH and I went to pick them up and Farmer Joy helped catch them and load them into the cages.  That part went well.

There's a proper way to do things when you introduce new animals to the farm.  Chickens in particular need to be placed in a seperate pen for a few days for a several reasons.  Most importantly you don't want to bring in disease and infect your entire flock so although the chickens looked perfectly happy and healthy it's just a  good idea as a precaution.

They also need to learn where HOME is.  We free-range our chickens and they love to roam but they (mostly) know that when it's getting dark it's time to come home and head for the chicken coop where they are securely locked in from predators at night.

A Red Sex-link
When we got home we lifted the cages out of the van and brought them into the barn but the door to their coop wasn't wide enough to bring the cages all-the-way-in.  Can you see trouble brewing?  I thought I did quite well - 10 out of 11 isn't bad!  One Black Sex-link flew and jumped (would that be flumped?) out of the cage and took off running. Since I am not Farmer Joy she wasn't being very good about coming back.   If you've ever chased a chicken out in the open you will know that it can be an effort in futility so after 15 minutes I gave up and she joined the free rangers.  Hopefully they had a chicken-to-chicken talk with her about where to spend the night!

Visiting Farmer Joy at her farm was a pleasure and she introduced me to what I hope is my next breed of chicken - a Silver Laced Wyndotte - oh-so-gorgeous. She had two hens and a rooster that ran with the chickens I bought from her. I think the incubator will be coming out in the next few days to hatch some of their eggs.  Even a cross breed would be pretty!  (In case you're wondering how that works: when a chicken is bred it's eggs are fertile for approximately two weeks.)

Every chicken deserves a name so the girls were named after some of my  online friends and two sweet little girls - Teagan and Elyse.

For the last two winters we have "babysat" some baby cows for our neighbour.  We don't have to take care of them but they live in our barn and they spend most of their day on the cement-paddock eating hay - at least that's how it's supposed to work.  They arrived on Saturday and by Sunday afternoon they had discovered a weak spot where the gate wasn't as secure as it should have been and decided the grassy paddock was much more to their liking.  Well - it wasn't to MY liking since they were tearing up the grass that my sheep and donkey will be eating next spring. So Luke and I went out to herd them back where they belonged - after a few turns around the field we finally got the gate closed behind them, locked it up tight and thought we were done with it...

Not.  An hour later they were out again.  Ack - sneaky burgers - we missed a smallish hole in the fence.  This time we had a plan that included three people, some sticks to prod them in the right direction and a whole-lotta-rope to close up the hole.  So far - so good!

The cows are really sweet looking.  They have been lowing (as in in the Christmas carol - the cattle are lowing) and missing their mommas.   I would love to be friends but they are very skittish - I guess I would be too if I had been chased around a field by a crazy-lady with a stick.

Eight cute little 1000+ pound cows  who are as yet un-named...JUST-THINK for only $19.95 you can have a cow NAMED-AFTER-YOU.  Your package will include a signed portrait of your cow and one year of regular updates of their health and well being.   You might even be invited to the farm to pet them or chase them out of the grass paddock - if it bears your name I think that should be YOUR responsibility.


If you liked this post please share it with your friends and leave me a comment.

Saturday, March 3, 2012

Easy Olive Oil Lamp

I am a creative kinda gal and when I saw this idea I was intrigued. It's a homemade oil lamp made up of mostly things you might already have laying around the house and it's a simple 5 minute project. 


I am concerned with the indoor air quality of our home and because I suffer from allergies to chemicals I was really excited to try this and see if I had a reaction.  There's no scent  (according to my kids) and it doesn't bother me at all!  A perfect alternative to cheap tealights and much cheaper than purchased beeswax candles.

The idea came from an oil lamp kit I bought recently at Lehmans.  The kit contained the wicks and a metal holder.   The total height is about 3.5 inches.  The circle on the bottom is important because it keeps the wick centered in whatever container you choose.

All you need is:


1. a heat proof container...a small tealight holder, a recycled glass jar or a pottery container would be perfect. 


2. a wick - which is just cotton thread and if you don't have an offical wick around the house you could experiment with twisted cotton yarn or a  rounded (as opposed to flat) cotton shoelace - the only downside is they may burn down quicker than a "real" wick.


3. the wire device as seen in the picture above or a large paperclip or a roll of wire if you're creative with the pliers.


4. some olive oil - expired oil works just fine and it's a good way to use it up.  Other oils will work as well but some will produce more smoke than others.


Thread the wick through the center of the wick holder and leave about a quarter inch showing.  It should be snug enough to hold the wick with out it falling out but loose enough so you can pull the wick through it to adjust the length of the wick.


Make sure the wick will burn in the center of the container.  The handle part is essential in re-lighting the lamp.  It's important that the wick stands straight up - if it's crooked it doesn't burn as brightly or as long.


Add oil until it's about a 1/2 inch below the wick.  Let is sit for a few minutes to soak up the oil and light with a BBQ lighter - matches will burn your fingers :)

This little lamp is about 2.5 inches high.  It started out with about 1 1/4 inches of oil.  It's already been burning for 5 hours and not even half the oil is used up.  I am guessing it would run at least another 4 or 5 hours before it runs out of fuel.


As with any open flame use caution and common sense as to where you place your oil lamp and never leave an open flame unattended.  For a layer of added protection place the jar inside a glass bowl or a crystal candy type dish.

Emergency lighting and so cute to boot!


If you liked this post please share it with your friends and leave me a comment.